Алисия Гоулд (Alicia Gould) — фотохудожник (+инструкция по фотографированию младенцев)
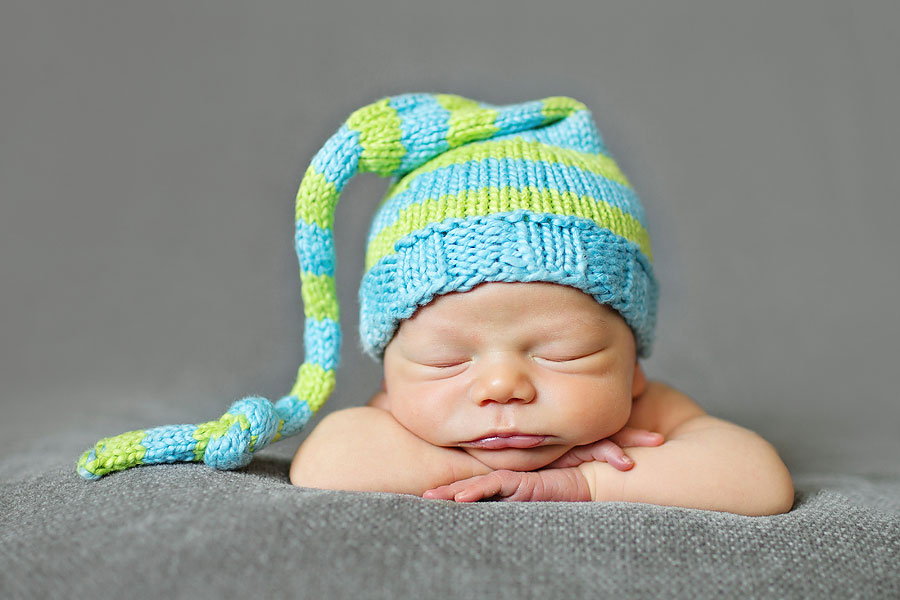
Алисия Гоулд (Alicia Gould) снимает новорожденных детей в возрасте от трех до пятнадцати дней. Пока ребенок спит, родители выбирают предложенные им фон и аксессуары для «фотосессии», Alicia Gould готовится чтобы провести свою работу быстро и по минимуму утомить ребенка. Она признается, что работа с детьми и их родителями очень сложный процесс. И несмотря на огромный опыт эту работу невозможно выполнить без любви. Эта любовь, тепло и нежность отражается в ее фотографиях.

Съемку новорожденных Alicia Gould выполняет более 8 лет. В среднем, в год, она проводит 20 таких фотосессий новорожденных и в каждом таком сеансе присутствует определенный ритм и поток, который во многом определяется возрастом и повидением ребенка. Она советует освоить несколько успокаивающих уловок, которые будут иметь большое значение для позирования и проведения съемок новорожденных.


Не смотря на такой огромный опыт, Alicia Gould до сих пор сталкивается с сложными фотосессиями, и говорит, что «каждый ребенок индивидуален, поэтому нельзя ожидать, что сеанс с новорожденным пройдет гладко. Важно установить реалистичные ожидания для себя и своих клиентов. Иногда вы совершаете ошибку или видите что-то после того, как уже сделано и нет возможности ее изменить. Но так мы учимся. В следующий раз вы обязательно позаботитесь об этой скрученной руке, утонувшей ноге или морщинистом фоне».

Несмотря на возникающие трудности, Алисия Гоулд влюблена в малышей, потому с удовольствием берется за эту работу. За эти годы она стала настолько популярна, что ее график расписан на несколько месяцев вперед, а детские фотосессии составляют 80% её дохода.

Работа всегда проходит в доме родителей. Alicia Gould привозит туда необходимый реквизит. Съемка может занять от 45 минут до трех часов, если младенец просыпается и его приходится успокаивать.

В этой публикации juicyworld.org — рассказ, о том как Алисия Гоулд проводит типичную фотосессию, с иллюстрированной инструкцией «FOR POSING NEWBORNS 5 WAYS».
The images to follow were all taken during my two-hour session with a sweet little newborn baby girl, 15 days new. Ideally, your model will be asleep when you arrive and will not make a peep throughout your session. If that’s the case, you will be able to go through every image in the workflow. Unfortunately, this is usually not the case for me.
My goal for each newborn photo session is to utilize two blankets and a fur in at least three to four different poses. Sometimes I need to revisit my plan if the baby is gassy or just having a bad day. I may use only one blanket and really work to get creative with my angles to get the most out of each pose. Or, I may focus on wrapping with different furs to keep the baby snug and warm.
How I begin each session depends on the baby. If the baby is very sleepy, I’ll move into the posed images. If the baby seems unsettled but not crying, the family images come first. These in-the-moment decisions for posing newborns get easier with practice and experience.
Here’s what a typical newborn photo session looks like for me:
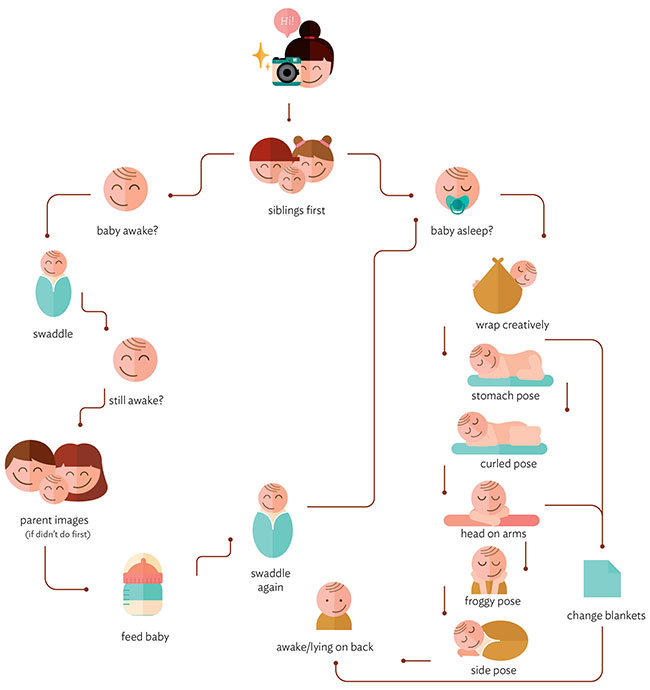
My typical workflow for a session. Illustration by Grecia Garcia.
Newborn pose #1: wrapped
Since the baby is awake, I start by wrapping her, keeping the diaper on. This ensures her arms and legs are tucked in tight and she stays warm to help her fall asleep.
Sometimes, more than a light wrap is necessary. Like I said, each baby is different. In this case, the newborn begins to fuss and cry a bit. In an effort to sooth her, I wrap her in a snug swaddle using white fabric. I then cover it with a cream-colored wrap and carefully tuck the white swaddle under the cream-colored wrap so that the white doesn’t show.
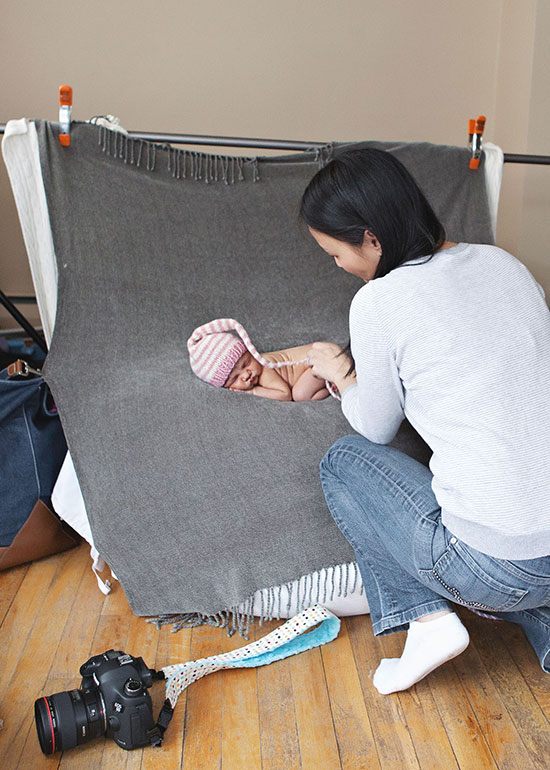
After a few minutes wrapped tightly, the baby calms down for a few shots and I’m able to remove both wraps and switch to a purple one. I like to use flokati rugs on a beanbag so the lower half of the baby’s body can sink into the beanbag. The give of the beanbag surface lets me create indents for the baby to lie in. If I feel I need to raise the baby’s head, I often place a small towel under the head.
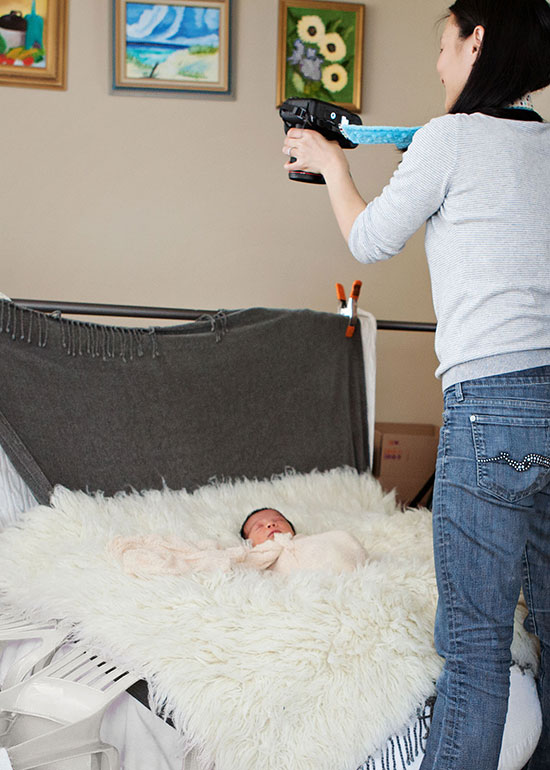
In this shot, I’m using my Canon 35mm f/2.0 at f/2.2. I’m 5 feet tall, so even at 35mm, I can’t get the baby in the frame. When I stand on a stool or a chair I still can’t get directly over the baby’s head and I don’t want to shoot from an angle; I want to be directly over her face. You can see in the pullback that I place the camera (with the strap secure around my neck) directly over the head and use live view. I make sure I can see the LCD so that I can focus and compose the image.
When I place the baby on her back, I make sure to move around and capture different angles to utilize the nice directional light. This includes using a macro lens if you have one
Newborn pose #2: stomach
The newborn should be content, warm and sleepy now. Before I pick her up from the fur, I will remove the diaper and loosen the wrap. I want to keep the wrap around her for the warmth, but I don’t want it to be difficult to remove when I lay her back down on the gray blanket.
Once she’s lying down, I will remove most of the wrap from her upper body, but I’ll be sure to leave it around the bottom half in case I need to soothe her. I move the baby to her stomach and make sure she is asleep before I begin to refine the pose.
Once the baby is in the general pose with her legs tucked in, I use receiving blankets, burp cloths, wraps, and essentially anything within my reach to elevate the head and legs. If you don’t do this, you’ll end up with a very boring composition.
WHEN POSING NEWBORNS, DETAILS ARE KEY.
Posing newborns well is about remembering the details. Raising the baby’s head helps flatten the hand and bring the cheek forward. Elevating the baby’s bottom half will create a gorgeous arch to her back and bring out the adorable back wrinkles. Make sure the knee and elbow are close, if not touching.
Also make sure you are posing the newborn on top of several layers of blankets. This will ensure that the top blanket remains seamless and you won’t see any lumps from where you manipulated the pose.
The last thing I do prior to shooting is open the baby’s hand. Make sure the baby’s cheek rests on her hand and use the weight of her head to keep the fingers open. Add more towels underneath, or reposition the ones already under, if the hand sinks into the blanket.

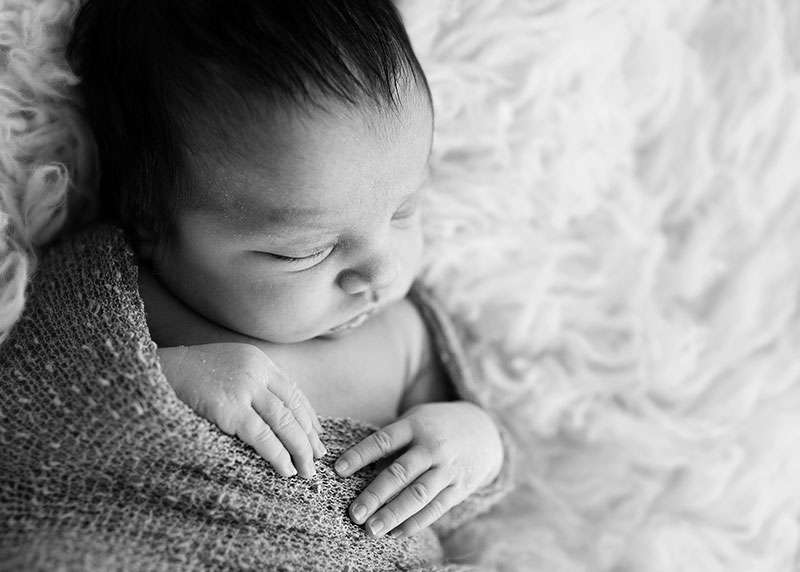
Newborn pose #3: head on arms
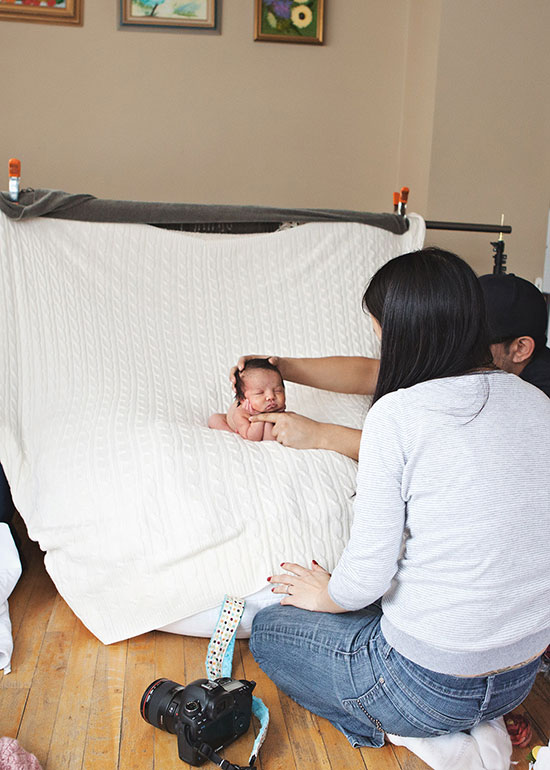
When I move the newborn from the stomach pose or the curled pose to the head on the arms pose, I take the opportunity to change blankets. A good tip for posing newborns is to always layer your blankets. In this case, I have my next blanket all ready to go underneath the grey one. I place a blanket over the baby, pick her up, then throw the gray blanket over the background stand uncovering the cream blanket that’s already set up.
Next, I lay the baby in the middle of the beanbag and pull back the blankets so I can create a pillow for the baby’s arms. I fold some receiving blankets on the long side and place them under the blankets. Then I push down on the beanbag where the baby is lying to create a little pocket for her bottom to rest.
The next part is tricky: While standing over the baby, I gently lift under her arms with my fingers, while supporting her head with the palms of my hands and my thumbs. I position her arms so they are on top of each other and rest them on the pillow I created. I keep one of my hands firmly on her head while I sit back down to refine the pose.
You want the wrists, not the hands, to overlap. If the elbows are too far apart, the pose will not look right. Try to bring the chin up and forward so it doesn’t get buried in the arms. If the pillow you created underneath the blankets is even, the head should comfortably rest on the arms.
If you are having any trouble, use a finger to hold the head up while you take the image and remove it in post.

Newborn pose #4: froggy
It’s a nice transition from the head-on-arms pose to the froggy pose. I remove the pillow underneath the blanket to make the surface even and rest the baby’s head to the side while I try to bring the toes forward and the knees out.
If the baby starts to cry, I usually leave the legs tucked back. (At this point in the session, I’ve gone through a handful of poses already so the baby may be getting hungry.) If you can bring them out though, it adds a nice visual balance to the frame and is the reason for the name of this pose. The legs out to the side look like frog legs!
While the baby is lying down, adjust the hand that is resting between the blanket and the head. I prefer to open the fingers so they cup that side of the chin. Then I do the same to the other side.
With one hand, I hold the wrists together and with the other, I support the back of the head while bringing the baby upright. The most important part of this pose is keeping the wrists together. They create the couch for the chin to sit in. If the wrists come apart, the pose will look sloppy and the baby’s head will be harder to support.
SAFETY COMES FIRST WHEN POSING NEWBORNS.
Once I pose the newborn just the way I want, I have Mom or Dad replace my hands with one of their hands supporting the baby’s wrists and the other hand supporting the baby’s head. I compose the image and then ask the parents to gently remove the hand that is holding the baby’s head. I take my shot, then ask them to put the hand back and remove the other hand that is holding the wrists. I take the second shot so that I can use both images to create a composite in post. Remember, when posing newborns, safety comes first.
Pro Tip: Once you compose the initial image in your viewfinder, do not move. Stay exactly where you are so your shooting angle doesn’t change. This will make merging the images together in Adobe Photoshop later much easier.

Newborn pose #5: awake
The last thing I do at every newborn photo session is try to get an awake image. Parents really love images with their baby’s eyes open. I find it funny that, when posing newborns, we spend so much time in the beginning of the session getting our babies to sleep and then at the end we can’t wake them up!
In the beginning of the shoot, if the newborn is awake while she is swaddled, I’ll capture some shots with her eyes open. However, if she cooperates, she is probably asleep most of the time. When she does open her eyes, you want to overshoot a bit since babies don’t focus their eyes. You’ll find that out of 5 to 10 images, only a couple will have the newborn’s eyes focused on you.
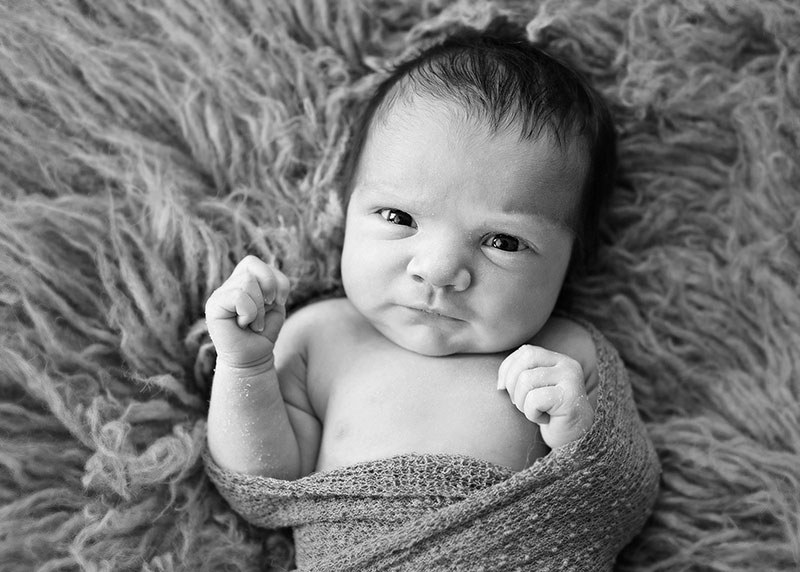
If the baby doesn’t wake up right away, it’s a great opportunity to add some more variety to the gallery. What I love about the end of a session like this is that I can go with the flow. I already have the posed newborn images I want, so I can either experiment here, or let the baby guide the last few poses. Fortunately with this little girl, I am able to capture some sweet smiles.
Once my newborn opens her eyes and is awake, you can see she decides to curl her little hands up in fists and wave them around.
I call these images a safe pose. The perfectionist in me wishes the baby would relax her hands a bit, but I capture her as she is. She is hungry and doesn’t enjoy me trying to wrap her up again.
Pro tip for posing newborns:
When I’m posing newborns, I take a safe shot for every single pose! When I get the newborn pose close to where I want it, I take the safe shot, then look for anything that can use a slight tweak. If the baby moves while I’m making that little adjustment, I already have an image I can use and move on to the next pose.
Еще несколько фотографий Алисия Гоулд (Alicia Gould) из других серий